
To create a delightful Ukrainian cake that’s sure to impress, it’s essential to gather the right ingredients. This easy Ukrainian cake recipe embraces traditional flavors and textures that are characteristic of Ukrainian desserts. Below is a list of the essential ingredients you will need:
| Ingredient | Amount | Purpose |
|---|---|---|
| All-purpose flour | 2 cups | This forms the base of your cake, providing structure and stability. |
| Sugar | 1 cup | Granulated sugar adds sweetness and aids in browning the cake. |
| Baking powder | 2 tsp | Acts as a leavening agent, helping the cake rise. |
| Salt | 1/2 tsp | Enhances the flavor of the cake. |
| Eggs | 3 large | Adds moisture and richness while aiding in the binding of ingredients. |
| Butter | 1/2 cup (melted) | Provides flavor and moisture, contributing to a tender crumb. |
| Milk | 3/4 cup | Incorporates moisture into the batter and helps dissolve dry ingredients. |
| Vanilla extract | 1 tsp | Adds depth of flavor to the cake. |
Each ingredient plays a crucial role in ensuring that your Ukrainian cake turns out delicious and fluffy. Make sure to use good quality ingredients for the best flavor and texture. If you’re unfamiliar with baking, don’t hesitate—this easy Ukrainian cake recipe is beginner-friendly and will reward you with an irresistible dessert that’s perfect for any occasion!
Step-by-Step Baking Instructions
Now that you have gathered all the essential ingredients, it’s time to dive into the baking process. Follow these step-by-step instructions carefully to create your delightful Ukrainian cake. You’ll find that it’s straightforward, fun, and quite rewarding!
- Preheat the Oven: Preheat your oven to 350°F (175°C). This ensures that your cake will bake evenly and thoroughly. While the oven is heating, you can prepare your cake batter.
- Prepare the Baking Pan: Grease a 9-inch round cake pan or line it with parchment paper. This will prevent your cake from sticking to the pan, allowing for an easy release once baked.
- Mix Dry Ingredients: In a large mixing bowl, sift together the all-purpose flour, baking powder, and salt. Sifting these ingredients helps to aerate the flour, resulting in a lighter cake texture.
- Cream Butter and Sugar: In another bowl, combine the melted butter and sugar. Using an electric mixer or a whisk, beat them together until the mixture is light and fluffy. This step is crucial, as it incorporates air into the batter, enhancing the cake’s rise.
- Add Eggs and Vanilla: Crack the eggs into the butter-sugar mixture one at a time, beating well after each addition. Then, stir in the vanilla extract. The batter should appear smooth and well-combined at this stage.
- Combine Wet and Dry Ingredients: Gradually add the dry mixture to the wet ingredients, alternating with the milk. Start by adding one-third of the flour mixture, followed by half of the milk. Repeat this process, ending with the flour mixture. Mix until just combined—overmixing can lead to a dense cake.
- Pour the Batter: Carefully pour the cake batter into the prepared pan, smoothing the top with a spatula to ensure even baking. Give the pan a gentle tap on the counter to release any air bubbles trapped in the batter.
- Bake the Cake: Place the cake in the preheated oven and bake for approximately 25 to 30 minutes, or until a toothpick inserted in the center comes out clean. Keep an eye on it towards the end to avoid overbaking.
- Cool Down: Once baked, remove the cake from the oven and let it cool in the pan for about 10 minutes. After that, gently run a knife around the edges and invert the cake onto a wire rack to cool completely.
Following these steps will yield a beautiful, fluffy cake that embodies the essence of an easy Ukrainian cake recipe. Once cooled, you can choose to frost it, serve it plain, or enjoy it with a sprinkle of powdered sugar. Happy baking!
Tips for Perfecting Your Cake
To ensure that your Ukrainian cake comes out perfectly every time, there are some valuable tips worth considering. Baking can be as much an art as it is a science; it’s crucial to pay attention to details and make adjustments to suit your style and conditions.
1. Ingredient Temperature: It’s best to have your butter and eggs at room temperature before mixing them. This helps to create a more homogenous batter and contributes to a lighter texture in your cake. If you’re in a hurry, you can cut the butter into small pieces or warm the eggs in a bowl of lukewarm water for a few minutes.
2. Measuring Ingredients: Accurate measurement of your ingredients can significantly impact the results. Use kitchen scales for the most precise measurements, especially for the flour. Aerate the flour before measuring by fluffing it up with a spoon and dipping it into your measuring cup, then leveling it off with a knife. This prevents adding too much flour, which can lead to a dense cake.
3. Avoid Overmixing: After combining the wet and dry ingredients, mix just until incorporated. Overmixing can develop gluten in the flour, resulting in a tougher cake. A few lumps in the batter are perfectly fine—don’t worry about achieving a perfectly smooth mixture!
4. Oven Thermometer: If you’re serious about baking, invest in an oven thermometer. Home ovens can often be inaccurate, altering baking times and temperatures. Adjust the temperature accordingly to ensure that your cake bakes evenly. If the temperature is too low, your cake may not rise well; if it’s too high, it could brown too quickly or crack.
5. Cooling Time: Allow your cake to cool in the pan for at least 10 minutes before transferring it to a wire rack. This cooling time permits the cake to firm up, making it easier to remove from the pan. Don’t rush this step; if you try to remove it too soon, it may break or crumble.
6. Frosting or Glazing: When you’re ready to frost your cake, ensure that it is completely cooled; otherwise, the frosting may melt. Consider using a simple glaze made from powdered sugar and milk or a cream cheese frosting for added flavor. If you decide to enhance your easy Ukrainian cake recipe with layers, make sure to apply a crumb coat first—a thin layer of frosting to lock in crumbs—before adding the final coats.
7. Storage Tips: If you have leftover cake, store it in a sealed container at room temperature for up to three days, or in the refrigerator for up to a week. For longer storage, consider freezing individual slices. Wrap the slices tightly in plastic wrap and place them in an airtight container; they can last up to three months in the freezer. Just remember to let them thaw before enjoying!
By following these tips, you can elevate your baking skills and ensure that your Ukrainian cake turns out light, fluffy, and irresistibly delicious. The joy of baking is found not just in the end result but in the process itself, as each step you take adds to the final masterpiece. Happy baking!
Common Variations and Additions
When it comes to enhancing your easy Ukrainian cake recipe, there are numerous delicious variations and additions you can incorporate. This flexibility allows bakers to personalize their cakes based on preferences and seasonal availability, ensuring that each cake is unique and satisfying. Here are some popular ideas worth exploring:
1. Fruit Fillings: Adding fruit can bring extra moisture and flavor to your cake. You can fold in fresh fruits like blueberries, raspberries, or chopped apples into the batter before baking. Alternatively, consider layering your cake with fruit jam or preserves. A classic option is to use sour cherry or strawberry jam, which perfectly complements the sweetness of the cake.
2. Nuts: Chopped nuts like walnuts or almonds can add a delightful crunch and rich flavor. Toasting the nuts before adding them to the batter can enhance their nuttiness and create a deeper flavor profile. Simply stir in about 1/2 cup of chopped nuts to the batter just before pouring it into the pan.
3. Citrus Zest: Infusing your cake with citrus can brighten its flavor. Grate the zest of a lemon or orange into the batter to give your cake a refreshing twist. The acidity from the citrus works well to balance the sweetness, creating a more complex flavor that is pleasing to the palate.
4. Cream Cheese Frosting: If you’re looking to elevate the richness of your cake, consider topping it with cream cheese frosting. To make this frosting, whip together softened cream cheese, butter, powdered sugar, and vanilla extract until smooth. This tangy frosting pairs wonderfully with the fluffy texture of the cake and adds an indulgent touch.
5. Chocolate Variations: Chocolate lovers can add cocoa powder to the recipe, creating a chocolate version of this easy Ukrainian cake. Substitute 1/2 cup of the flour with unsweetened cocoa powder and adjust the sugar slightly to balance the bitterness. Another tasty twist is to swirl in melted chocolate or chocolate chips into the batter before baking, giving your cake luscious pockets of melted chocolate.
6. Spices: Enhance your cake’s flavor by adding spices. Cinnamon, cardamom, or nutmeg are popular choices that can evoke the warm flavors of Ukrainian desserts. Simply incorporate about a teaspoon of your chosen spice into the dry ingredient mixture for a comforting, aromatic touch.
7. Yogurt or Sour Cream: For an even richer cake, substitute some of the milk with yogurt or sour cream. This not only adds moisture but also contributes to a tender crumb and a slight tang that contrasts deliciously with the sweetness of the cake. Use an equal amount in place of the milk for best results.
8. Layering and Filling: For those feeling a bit more adventurous, consider making a layered cake. Bake two or more layers of the cake, then fill each with your favorite fillings—be it fruit, whipped cream, or custard. This approach can transform your easy Ukrainian cake recipe into a stunning center piece for any occasion.
By experimenting with these variations and additions, you can create a cake that truly reflects your tastes while celebrating the rich tradition of Ukrainian baking. The best part about these modifications is that they allow you to explore new flavor combinations and elevate a simple cake into a memorable dessert. So, don’t be afraid to get creative and make your Ukrainian cake uniquely yours!
Serving and Storing Your Ukrainian Cake
Once your delightful Ukrainian cake is baked and ready to be enjoyed, serving it becomes an equally important part of the experience. This cake can be a scrumptious centerpiece at any gathering, be it a family celebration, a festive holiday, or simply an afternoon tea with friends. Here are some suggestions for serving and storing your cake to ensure it remains as enjoyable as the first slice.
Serving Suggestions:
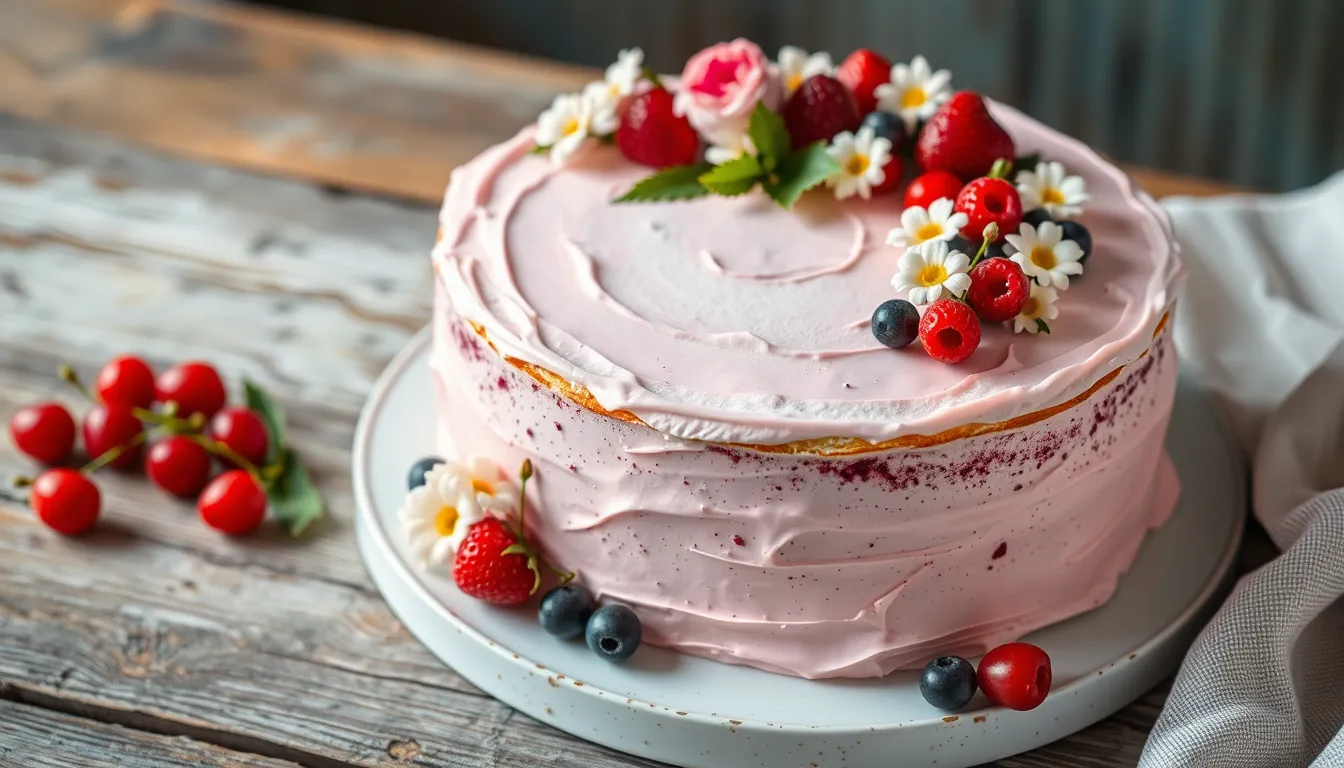
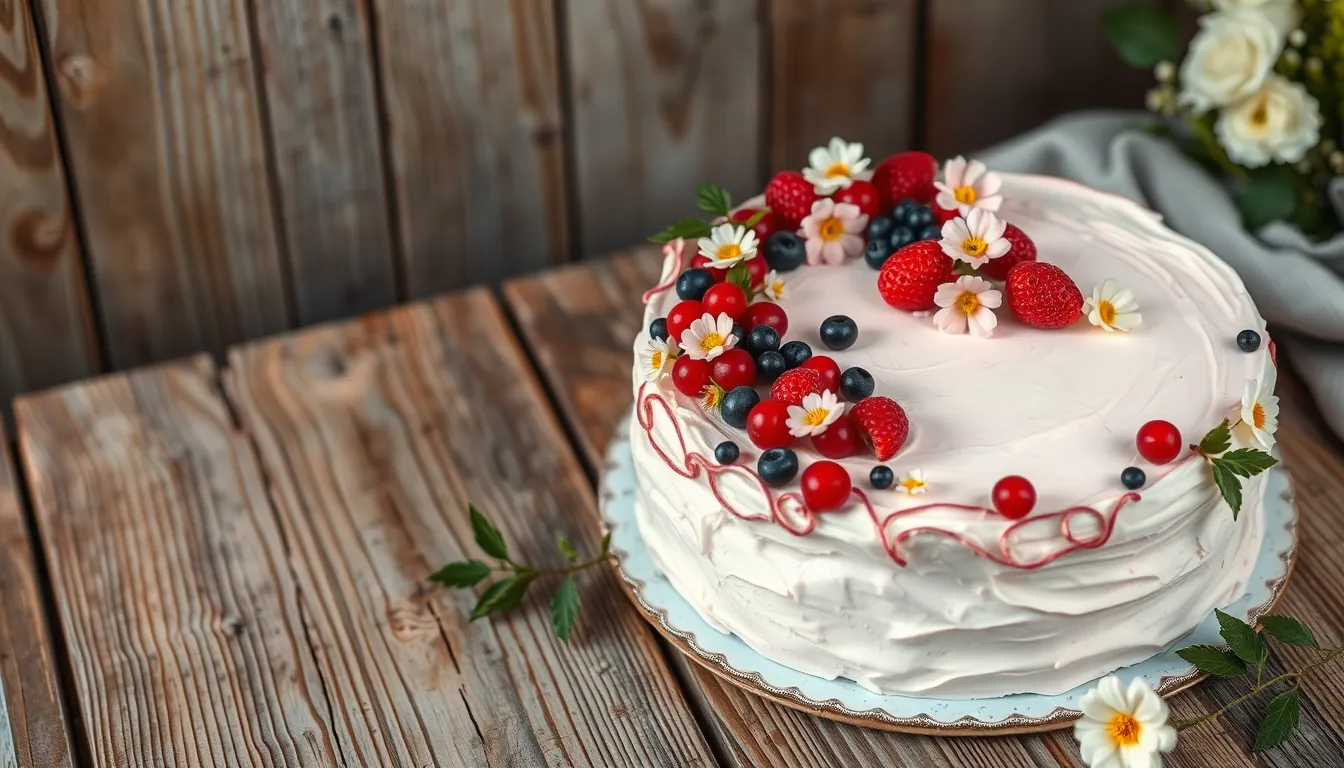
- Garnish with Fresh Berries: Top your cake with fresh berries, such as strawberries, raspberries, or blueberries. Not only do they add a pop of color, but their tartness complements the sweetness of the cake beautifully.
- Dust with Powdered Sugar: For an elegant presentation, lightly dust the cooled cake with powdered sugar. This simple garnish enhances visual appeal without overwhelming the cake’s flavor.
- Add Whipped Cream: A dollop of fresh whipped cream can elevate your cake to the next level. The light and airy nature of whipped cream provides a delightful contrast to the moistness of the cake.
- Syrup or Sauce: Consider drizzling the cake with a flavored syrup or sauce, such as chocolate, caramel, or a fruit puree. This not only adds flavor but can also create an inviting presentation.
- Layered Presentation: If you’ve opted for a layered cake, showcase its beauty by slicing into a few pieces to reveal the layers inside. This can be visually stunning and will undoubtedly entice your guests.
Storing Your Cake:
Proper storage is key to maintaining the freshness of your cake. Depending on how quickly you plan to consume it, there are a few methods to consider:
- Room Temperature: If you expect to finish the cake within a few days, simply cover it with a cake dome or plastic wrap at room temperature. This will prevent it from drying out.
- Refrigeration: For longer storage, keep the cake in the refrigerator, again covered with plastic wrap or stored in an airtight container. This can extend its shelf life up to a week.
- Freezing: If you want to preserve your cake for a longer period, freezing is an excellent option. Wrap individual slices tightly in plastic wrap, then place them in a freezer-safe container or bag. This method allows you to enjoy a slice of your easy Ukrainian cake recipe even weeks later. When you’re ready to indulge, simply thaw it in the refrigerator overnight or at room temperature for a few hours.
For optimal texture and flavor, bring refrigerated or frozen cake slices back to room temperature before serving. A little patience pays off, enhancing the overall taste and making every bite of your delicious creation memorable.
With a few thoughtful serving and storage techniques, your easy Ukrainian cake recipe will shine at any event and continue to delight your taste buds long after it’s baked. Enjoy sharing this delightful treat with loved ones while savoring the sweet taste of your culinary success!